
Hello friends and welcome to the sewalong for the Barrymore Jeans. This is going to be easier than you think, so are you ready to get stared?
This post is going to be comprehensive for all steps. It's going to be a long one, but I find it better to have all information in one place instead of having to jump back and forth between different posts.
Any steps that are followed by an asterisk "*" indicate the use of denim topstitching thread, if so intended.
1) With right sides together, sew the back yoke to the back leg with 1/2” (1.2cm) seam allowance. Iron seam allowance up and topstitch in place*.

Double needle topstitching above the yoke seam is recommended for traditional jeans look.

2) On the back pocket piece, turn back the sides and bottom edges in towards the wrong side 1/2” (1.2cm) and iron flat. Stitch* through all layers 3/8” (1cm) in from the edge. Turnback the top edge of the pocket bag 1/4” (.6cm) and then 1/2” (1.2cm), towards the wrong side. Topstitch* 3/8” (1cm) from the edge.

3) Using the circles on the back leg pattern piece, transfer these markings to your back leg pieces using chalk, tailor tacks, or your preferred method.
Align the back pockets to the markings. Topstitch* through all layers from the top edge of the pocket, around the bottom and up the remaining side. Make sure that the top edges get a couple of extra stitches back and forth for reinforcement.

4) With the right side of the pocket bag facing up, position the pocket facing piece on the side without the curved cut out. Edgestitch the facing to the pocket bag.

5) With right sides together, sew the pocket bag to the pocket opening on the front of the jeans, along the curved edge, with 3/8” (1cm) seam allowance. Trim seam allowance off to approximately 1/8” (3mm) width to ensure a smooth curved edge. Repeat for the opposite side.

6) Pull the pocket bag upwards and iron the seam allowance up. Understitch the seam allowance towards the pocket bag side along the pocket opening curve. Repeat for the opposite side.

7) Turn the pocket bag to the inside of the front leg. Working on the outside of the front leg, iron the pocket opening curve, ensuring that the pocket bag is not visible from the outside. *Edgestitch next to the curve through all layers. Add an additional row of topstitching 1/4”(1.2cm) away from previous stitches, if desired. Repeat for the opposite side.

8) (A) Working on the wrong side of the front leg, fold the pocket bag in half, matching edges at the hip. Sew the bottom of the pocket bag together (right sides will be together) with 1/2” (1.2cm) seam allowance.
(B) Baste the top edge of the pocket to the front of the leg and along the side seam.


9) With right sides together, sew the front leg to the back leg along the side seams with 1/2” (1.2cm) seam allowance. Repeat for the opposite side.

10) With right sides together, sew the front inseam to the back inseam with 1/2” (1.2cm) seam allowance. Turn right side out. Repeat for the opposite side.

11) Mark the dot on the front leg crotch curve on the wrong side. With right sides together, sew the right leg to the left leg by matching the crotch curves. Sew together with 1/2” (1.2cm) seam allowance. Stop exactly at dot on the front.

Optional topstitching*: Iron the seam allowance towards the wearers left side. Edgestitch through all layers, stopping exactly at the dot on the front.

12) Fold back the center front fly edge 3/8” (1cm) on the wearers right side. Iron flat.


Trim off 3/8” (1cm) along the line on the wearers left front.

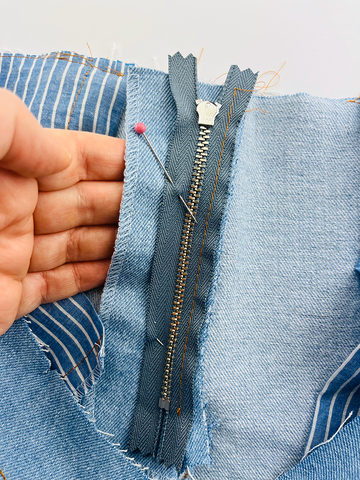
13) Position the zipper tape underneath the folded edge of the wearers right side front. Align zipper teeth along side the folded edge. Position zipper stop to end at the front dot/where crotch sewing ended. Edgestitch along the folded edge to secure the zipper to the front.

14) With right sides together, sew the fly facing to the wearers left front with 1/2” (1.2cm) seam allowance, stopping at the dot. Turn the fly facing to the inside and iron flat so the facing is not visible from the outside.

Optional Topstitching*: Add an edgestitch along the center front edge that will match back to where the crotch topstitching ended in step 11.

15) Working on the right side, arrange the front edge so the center front lays flat and smooth. Pin the loose side of the zipper tape and fly facing through the front.

Working on the inside, carefully remove the outside pins while holding the zipper and facing in place. Pin the zipper tape to only the fly facing.

Sew the zipper to the facing piece, through the center of the zipper tape.
16) On the right side of the jeans, place the fly template on wearers left side, aligning it to the center front edge. Using chalk or removable marker, trace the shape.

Follow the marks to apply a topstitch,* or double needle topstitch, through the front and the fly facing to secure the layers together. Ensure that topstitching will not hit zipper stop.

17) Fold the fly shield in half, wrong sides together, and iron flat. Stitch the bottom edge and long vertical edge together.

18) On the inside, position the fly shield on top of the zipper. Align the notch on the top of the fly shield to the zipper teeth edge. Pin or baste in place.
Working on the right side, open the zipper and topstitch on the exact same stitching line as you used to join the zipper to the wearers right side to secure the zipper shield in step 13.

19) Close zipper. On the outside of the jeans, do a couple of horizontal stitches over top the fly topstitching at the lower part of the curve to secure the fly shield. Make sure that you don’t accidentally catch the back of the jeans with this step.

20) Make the belt loops. Fold the long vertical edges inwards using the notches as a guide. The folded edges should overlap. Iron flat.

Edgestitch each side. Divide and cut the loops into 5 sections.

21) Position loops right side down at “V” notches along the top waist edge. Baste in place.
Mark 1” (2.5cm) down from the top edge of each loop. Topstitch the loops to the jeans.

22) With right sides together, sew the left waistband to the right waistband with 3/8” (1cm) seam allowance. Repeat for the remaining set of waistband pieces.

23) Align the two sets of waistbands along the top edge with right sides together. Sew together with 3/8” (1cm) seam allowance.

24) Open the waistband and understitch the seam allowance towards the facing side. (Facing side can be identified by orientating the waistband as the sketch, using wearers left side notches as a guide.)

25) With the wrong side up, on the facing side of the waistband, turn up the bottom edge 1/4” (6mm). Iron flat all the way across the bottom edge.

26) With right sides together, sew the waistband to the body with 3/8” (1cm) seam allowance, matching notches to center back and side seams. Make sure that edges of the waistband extend past the front edges 3/8" (1cm) each side. Pull waistband up and iron seam allowance upwards.


27) With the wrong side of the waistband facing up, take the center front vertical edges and turn in the edge 3/8” (1cm) and iron flat. You can use the center front edge of the zipper front as a guide.

28) Hand baste the waistband facing in place on the inside of the jeans. Start at the center front and continuing to the opposite side.

29) Working on the outside of the jeans,
edgestitch* all around waistband to secure the center front edge and the facing. Remove the basting stitches.

30) One-by-one, pull each belt loops to the top of the waistband and tuck the end underneath itself. Topstitch* a few times back and forth across the top and the bottom edge of the loop through all layers.

31) Turn back the bottom hem edge 1/2” (1.2cm) twice and topstitch * through all layers.
32) Follow the marks on the waistband pieces to make your buttonhole for the wearers left side and position the center front button into place on the wearers right side.
That's it! How did your jeans turn out? I hope you enjoy them :)